
A STEP-BY-STEP GUIDE TO STARTING A NEW DATABASE
PLANNING THE STRUCTURE OF YOUR DATABASE
The first thing you need to do is decide on how you're going to structure your database. If you are not familiar with databases and how they work, please read our Database 101 tutorial before you start. If you're not sure what fields, tables, and records are, this is definitely recommended reading!
Read the Table Structure Tutorial to find out about the tables in CatBase and work out the best way to set yours up.
Once you've decided on the structure of your data, you're ready to set it up.
Databases and Database Projects
First of all, let's clarify the terminology around Databases and Database Projects.
Database
A CatBase database is a file stored on your computer (or server). These files always have the file extension .4DD. For example, the example database that we include with new CatBase installations is named CatBase Demo.4DD. This could be quite a large file - anything from about 5Mb up to gigabytes, depending on how much data you have in your database.You can use one of the Database Projects in the Demo Database as the basis for your project, or you can create a new database from scratch.
Database Project
Each CatBase database contains at least one database project. A database project consists of the tables, fields, Publishing Styles and so on that you'll use to manage and publish your data.
You might need only one Database Project. But if you have several distinct projects - projects for different clients, perhaps - you can have as many Database Projects as you need.
If you're using one of the multi-user versions of CatBase, each user can be working on a different Database Project.
See the Database Projects page for more info.
How to Create a new Database
The procedure for creating a new database is slightly different depending on whether you are using CatBase Single-User or the Multi-User version.
Creating a new Database with CatBase Single-User
There are two ways to create a new database:
-
If CatBase is already running, choose Create a new Database from the File menu,
or -
As you start CatBase up, hold down the Alt/Option key on your keyboard. Keep holding it down until the Open Data File dialogue appears, then click on the New … button.
-
You'll then see a Create a data file … dialogue with a default database name displayed.
-
Go to the next step.
Creating a new Database with CatBase Multi-User
-
If CatBase is already running, Quit.
-
Start CatBase on your server, but hold down the Alt/Option key on your keyboard as CatBase Server starts up.
-
Keep holding the key down until the Open Data File dialogue appears, then click on the New … button.
-
You'll then see a Create a data file … dialogue with a default database name displayed.
Next ...
-
The default name for the new data file is the CatBase program name, which isn't very useful. Change the name to something more meaningful to your project.
-
Make sure that the new data file is going to be saved into a suitable folder - eg your Applications->CatBase folder (Mac) or your Documents->CatBase Files folder (Windows).
-
Click the Save button.
-
CatBase creates the new database and opens it.
-
It creates one Database Project and names it "Default Project".
-
You'll see a Help Topic window with the heading "Getting Started with a new Database Project".
Create a table
You must add at least one data table before you can proceed. To do this:
-
Click on the Admin tab.
-
Expand the Database Setup topic on the left of the window.
-
Click the Add a New Table button.
-
Enter a name for your new table. This should be your main data table - e.g. Products or Companies or Customers or whatever. (You can always change this if you want to).
-
Enter a name for the key field when prompted, and click OK.
CatBase sets up your new table, and adds its name to the main tab bar at the top of the window.
You can add fields and set up other options for the table, such as a keyboard shortcut and scripts to run when a record is created or saved now, or you can do it later. For detailed information about fields, see the Field Properties tutorial.
If necessary for your project, add more tables.
Relations
CatBase is a relational database, allowing you to set up many-to-many or many-to-one relationships between the tables. To manage these relations, click on the Manage Relations sub-tab. Here's an example of a newly set up database with two tables: Products and Parts:

In this example, we want to create a many-to-many relationship between Parts and Products: each Product can have any number of Parts and each Part can belong to multiple Products.
-
Drag and drop the Products table onto the layout area
-
Drag and drop the Parts table onto the layout area
-
Drag and drop the Parts table onto the Products table. Your design should now look something like this:
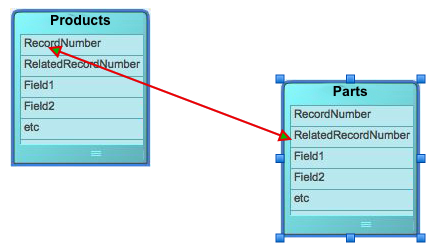
The double-ended arrow indicates that the Parts table is linked via the RelatedRecordNumber field to the RecordNumber field in the Products table. (Note - normally, you don't need to be concerned about the technicalities of how these relationships work - CatBase will handle the details for you.)
When a new Relation is created, by default it is set up as a many-to-one relationship. In this case, we want it to be a many-to-many relationship. To change this:
-
Double-click on the red line joining the two tables.
-
In the dialog that opens, select the Many to Many radio button.
-
Click the Save button.
See the Relations page for more info on how relations work.
Click the Save button when you're happy with the table relations setup.
THE FORM DESIGN WIZARD
Having set up some tables and fields, you need to be able to enter and view the data. That's done via the data entry forms, and you will need to add the fields and other objects that you want to use on your data entry forms. The Form Design Wizard is essentially a drawing program which enables you to place fields and other objects – such as lists of related data – onto a form that you'll use to enter, view, and modify your data. Click here to see the Form Design Wizard Tutorial.
GETTING DATA INTO YOUR DATABASE
OK - you've set up your database. Now you need to get your data into it. You can either import data from another source, such as a spreadsheet or another database, or you can add data manually.
IMPORTING DATA
You can import data from various sources, such as:
-
CSV (comma-delimited) file
-
Tab-delimited text file
-
Excel Spreadsheets (.xls or .xlsx format)
-
Another type of spreadsheet (by saving it as a CSV or Tab-delimited file)
-
An ODBC-compliant database such as MySql or SqlServer (CatBase Data Chameleon Edition)
-
An XML file
See the Importing Data Tutorial to learn more.
ADDING DATA MANUALLY
To enter data:
-
Select the table that you want to enter data into from the top row of tabs.
-
Click on the New Record button in the row of buttons at the top of the page
-
You might find it helpful to look at the CatBase User Interface tutorial and the Entering Data Tutorial.
MANAGING THE LIST VIEWS
When you select any of your data tables in the top row of tabs, you'll see a list of the records in that table (note - this list might show all the records, or some of them, depending on how you previously viewed that table.)
Initially, this list contains just one column: the Key Field from that table. You can add additional columns, rearrange them, and resize them.
TO ADD A NEW COLUMN
-
Right-click (Windows) or Ctrl-click (Mac) anywhere on the list, except in the header area. A popup menu appears.
-
Choose Add a Column from the popup list.
-
Choose the column you want to add from the popup list of fields in the next dialogue.
-
If the field you want to add doesn't appear in the list, that means it is already in the list view!
-
Click OK.
-
The new column is added.
TO REPOSITION A COLUMN
To reposition a column, click on the column header and drag it left or right, then drop it where you want it to go.
TO RESIZE A COLUMN
To resize a column, click on the dividing line and drag left or right (like a spreadsheet).
SAVING THE LIST VIEW SETTINGS
If you want to save the current setup of the list view, right-click on the list and choose Save the column settings for this view. in future when you go to this table, the list will appear just as it currently does.
PUBLISHING YOUR DATA
Finally ... the fun part!! The final step is to tell CatBase how you want to publish your data: What you want to publish; how you want it sorted; how you want each part of it styled; whether you want to publish pictures, and so on. This is all managed through the use of Style Sheets.
There are three types of Style Sheets in CatBase:
-
Character Styles: These specify the fonts, styles, etc. and relate directly to Character Styles in QuarkXPress and InDesign.
-
Paragraph Styles: These specify options such as paragraph spacing, indenting, etc. and they relate directly to the Paragraph Styles in your page layout or word processing program.
-
Publishing Stylesheets: These are unique to CatBase. They tell CatBase what data you want to publish, how you want it organised, and which Paragraph Style Sheets and/or Character Style Sheets to apply to each part of the data.
Please see the following Tutorials for more detailed info about publishing your data:
ANY QUESTIONS?
If you have any questions about the topics discussed here. or are not sure how to proceed, please contact us.