Quick Reports
NOTE: This Tutorial is for CatBase Version 8. If you're using an older version, please see the V7 Quick Reports page, as the interface is different.
Quick Reports offer a quick and easy way to produce reports on your data. They are useful when you want to create a report that doesn't need to be formatted like published data - for example, a list of contacts and their phone numbers, or a list of images that have been used in your products.
You can print the report, export it to a tab-delimited text file (which you can open up in a spreadsheet), or create HTML pages.
Opening the Quick Report Editor
The first thing you need to do is find the records that you want to include in your report:
-
Select the appropriate data table in the main tabs
-
Find the records you want to include in the report
-
NOTE: If you have related data in your database, please read the section "A note about related data", below.
-
With your list of records displayed, click on the Report button:
The Quick Report Editor opens up:

Adding columns to the report
Each column in the report will be a field from the selected table.
To add columns, click the Fields button at the top right of the window.

Select the fields you want to add to your report.
- You can select multiple fields.
- To select discontiguous fields, CMD-click or CTRL-click on individual field names
Then click the right-pointing triangle to move the selected fields to the Report Columns list.
You can re-order the columns by dragging and dropping them up or down in the Report Columns list.
Click OK when you've added the required fields.

Making changes to the columns
-
Reorder them by dragging and dropping the column header..
-
Right-click on a column header to perform various actions:
-
Insert a new column
-
Duplicate the selected column
-
Edit the column's formula
-
Delete the column
-
Duplicate the column
-
-
Hover over a column header and click the little arrow that appears to choose formatting options for that column:


-
To manually resiez a column, un-select the Automatic Width checkbox. You will then be able to resize the column by dragging the column divider (like in a spreadsheet).
-
To choose the destination for the report (file, print, or HTML) click the Destination button.
Creating the report
Once the report is set up as required, click the Execute button to create it.
A note about related data
You can include data from a related table in your report, but if you have a "many-to-many" data relationship, this will not work reliably. A many-to-many relationship exists when you have multiple "child" records related to multiple "parent" records - for example, Products and Parts: each Product can have any number of Parts related to it, and each Part can be related to any number of Products. (Please see our Database 101 tutorial for more info about database relations.) In this case, it would be better to create a Publishing Style Sheet and choose the Plain Text option for your Publishing Destination.
To include data from a related table:
-
You must start out with a list of records from the "many" table. For example, if you have Products and Parts, Parts is the many table. If you have Companies and Employees, Employees is the many table. It's the "child" table in the relationship.
-
The list of fields that initially appears in the Quick Report field list is from the many table. To include fields from the "one", or "parent" table, choose Related Tables from the popup menu above the field list.
-
The list of fields will then change a little. Scroll down until you see the relation indicator.
-
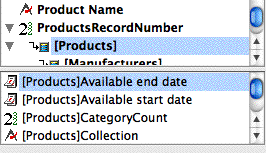
Click on the table that you want to get related data from - eg Products in this example. The field list changes again, to show the fields from the Products table:
Now you can add fields from that table to your report
NOTE: Relations in CatBase can either be Required or not. If the Required option is selected for a relation, a child record cannot be saved unless it has been linked to a parent record. Only Required relations will appear in the Related Tables dropdown menu in the Quick Report editor. To change this option for any relation:
-
Choose Admin from the main tabs.
-
Expand the Database Setup topic on the left of the window and select Table and Field Setup.
-
Select Manage Relations from the sub-tabs.
-
Double-click on the relation you want to manage (the arrow line between the two related tables).
-
Select the Parent record is required checkbox.
-
Save it.
