
BUILDING SIMPLE AND COMPLEX INDEXES WITH CATBASE AND INDESIGN
You can easily create simple indexes in InDesign by using the built-in Index feature. If your index requirements are more complex, you can use InDesign's indexing feature and CatBase together to produce any kind of index you need.
Simple Indexes: When you want to create an index simply based on selected words or phrases in the document.
Complex Indexes: When you need to include more details in the index than just the indexed phrases, or present them in a different way. For example, you've created a directory in which members are listed like this:
John A. Smith, DDS
But in the index you want them to appear like this:
Smith, John A., DDS
Or perhaps you've produced a directory of members of an organization, or a service provider directory, with the members sorted alphabetically by last name. But you need to build an index of members sorted by their specialties, or by their town or county.
BUILDING SIMPLE INDEXES IN ADOBE INDESIGN
InDesign provides an easy way to build an index based on selected words or phrases in a document. There are two steps:
-
Select the words or phrases you want to index.
-
When the layout has been finalised, tell InDesign to create the index.
SELECTING WORDS OR PHRASES TO INDEX
You can do this manually or - when you're using CatBase - simply tell CatBase which Element you want to index, and the index entries will automatically be created when the data is published.
SELECTING INDEX ENTRIES MANUALLY IN AN INDESIGN DOCUMENT
-
First make sure that the Index palette is visible. If it isn't, choose Window -> Type & Tables -> Index:

-
Select the word or phrase that you want to index
-
Click the Create a new index entry button on the Index palette:
You'll then see the New Page Reference dialogue:

(For detailed info about the options available here, see the InDesign documentation.)
-
Click OK
-
The index entry is added:

Of course, if you have lots of items to be indexed, this will be rather tedious. Fortunately CatBase makes it easy!
AUTOMATING THE CREATION OF INDEX ENTRIES WITH CATBASE
-
Open your Publishing Stylesheet
-
Open the Element that you want to index - for example, the Company Name, Last Name, Product Code, etc.
-
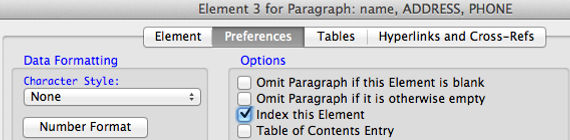
Go to the Preferences tab
-
Select the Index this Element checkbox:
-
Save the Element.
That's all you have to do. When you publish the data, the selected Element will be indexed for every record.
BUILDING THE INDEX
When you've finalised the layout and you are ready to create your index:
-
Go to the page on which you want to place the index
-
On the Index palette, click the Generate index button:
You'll see the Generate Index dialogue.
-
Choose the settings you want (see the InDesign documentation for detailed info about this).
-
Click OK to create the index
When it's done, you will see a "loaded" cursor showing a mini-index if this is the first time the index has been created in the document.
-
Click in the text box to place the new index.
Job done!
CREATING COMPLEX INDEXES
Sometimes you want to create an index that is based on selected words or phrases in the document, but it needs to be presented in a different way or perhaps include additional details. For example, you've created a directory in which members are listed like this:
John A. Smith, DDS
But in the index you want them to appear like this:
Smith, John A., DDS
The information is stored in fields in your CatBase database - eg:
-
First name
-
Initials
-
Last Name
-
Title
This can be achieved in the following way:
-
Create a simple index as described above.
-
Save the index as a text file.
-
Import it back into the database, updating the records with their page numbers.
-
Create an index containing any information from the database.
Before we embark on explaining this in more detail, there is one very important point to be made.
INDEX KEYS
In a simple index, you tell CatBase which field you want to build the index on - eg Last Name, Product Name, Company Name, Part Number, etc. - this is the Index Key. When we are working with complex indexes, it is essential that each index key is unique, as this is what will be used to match the indexed data to the records in the database. If the index key was on Last Name, you might have several Smiths, and CatBase wouldn't have any way of knowing which Smith each page number belonged to. So, you should use either the RecordNumber or the UUID field as the index key (see the Record Numbers and UUIDs tutorial for more info). Now you're thinking "But I don't want the record numbers in my publication!" So you can format them with a special Character Style which renders them effectively invisible. We'll discuss that in more detail in a minute.
There are five stages to building complex indexes:
-
Setting up the Publishing Stylesheet in CatBase
-
Publishing the data
-
Building the simple index
-
Importing the index back into CatBase
-
Publishing the index(es)
SETTING UP THE PUBLISHING STYLESHEET IN CATBASE
You simply need to:
-
Add the RecordNumber or UUID field somewhere in your Publishing Stylesheet. Usually, it's best to add it to the Paragraph that contains the key field (the Last Name, Company Name, Product Name, Part Number, etc.), as you can be sure that that data will be published for each record.
-
index that Element, and select a special Character Style for it. For example, we've set up a Paragraph that contains the First Name, Last Name, and RecordNumber fields:

The RecordNumber Element has these options selected in its Preferences tab:

Character Style: We've selected a Character Style called "hidden"
Index this Element checkbox is selected.
So, when the directory is published using this Publishing Stylesheet, each record's unique record number will be included; it will be indexed and set in the hidden Character Style.
PUBLISHING THE DATA
Publish your data in the usual way using the Publishing Stylesheet that includes the indexed RecordNumber. When you import the data into your InDesign document, you will probably see the record numbers, perhaps looking something like this:

You can clearly see the record numbers with each name ("2", "3").
If you open up the Character Style palette you'll see that a Character Style called recordnumber has been created (or whatever you named the Character Style that you selected for the RecordNumber field in CatBase). Edit that Character Style and select the following attributes:
Font Size: 0.1 pts
Tracking: -100
Character Colour: Paper
This will, effectively, make the record numbers invisible.
BUILDING THE SIMPLE INDEX
Make whatever edits are needed to the document. When the layout has been finalised, create the index as described above under the heading Building the Index.
Important Note: In the Generate Index dialog, in the Entry Separators area select Tab Character for Following Topic.
You should now have a text box containing the index entries, something like this:

The first column contains the unique record numbers, and the second column contains the page number(s). If an entry appears on more than one page (for example, if they are listed under multiple headings), these should all be included, as in the entry for record number 9 shown here.
Click into the Index text box
-
Select the entire first line ("Index") and delete it
-
Choose Export from the File menu
-
In the Export dialogue:
-
Enter a name for the file such as "index entries"
-
Make sure you know where it is going to be saved!
-
Select Text Only from the Format popup menu
-
-
Click Save, then Export
The text file will be created.
UPDATING THE DATABASE WITH THE PAGE NUMBERS
First, make sure that you have a suitable field to import the page numbers into. If there is any chance that a record may appear on more than one page, then the field must be a String or Text field. If you are confident that each record will only ever appear on one page, it can be an Integer field. Name this field something clever like Page Numbers. (You can find more info about creating and managing tables and fields in the Step-by-Step Guide to setting up a new database tutorial.)
If you have previously imported page numbers into this table, it's probably a good idea to delete all the existing page numbers before importing the new ones, just in case any records exist in the database which haven't been published for some reason. To do this:
-
Select the table you're going to update the page numbers into.
-
Click the Search & Replace icon at the top of the list.
-
In the Search Field popup, choose your Page Numbers field.
-
In the Change From area, select All Records.
-
Make sure that the first radio button is selected in the Change To area, and that the text area is empty.
-
In the Range area, select Search Entire Table.
-
Click OK.
(For more detailed info about this, see the Search and Replace tutorial.)
Next, create a new Import Style for the table that you want to import the page numbers into.
-
Name the Import Style something like "Page numbers update"
-
Make sure that the Tab-Delimited format is selected
-
Un-select the First line of import file contains field names checkbox
-
Click the Select button
-
Select the text file containing the index entries which you just exported from InDesign, and double-click it
-
Your Import Style should show two columns of import data, probably both labelled "Extra Field"
-
Click on the column heading for the first column and select the RecordNumber field.
-
Click on the column heading for the second column and select the Page Numbers field.
Note: If you get an error message, or if the data doesn't drop tidily into the two columns, try changing the Record Delimiter to Line Feed.
-
Click the Updates tab
-
You'll see a message about importing the Key Field or updating records. Click the Don't create new records button.
-
On the Updates tab, make sure that the Data Updating Options look like this:

-
Go to the Preferences tab.
-
Select the Trim Spaces checkbox in the Text Handling area.
-
Go back to the Main tab.
-
Click the Import Now button.
CatBase will import the index entries file and update the records with their page numbers.
PUBLISHING THE INDEX(ES)
Now that you've got the page numbers stored in the database, you can design Publishing Stylesheets to create indexes in any way you want.